
qFrame Documentation
Overview
Introduction
qFrame makes distributed rendering simple and efficient. Submit jobs from your favorite DCC application, and qFrame handles the rest—distributing frames across your machines, tracking progress in real-time, and delivering finished renders without the usual headaches. Whether you have a single workstation or a full render farm, qFrame scales.
Installation
Windows / Linux / Mac
Download the installer from qframe.io. Run the setup wizard and choose your configuration:
- Server — This machine coordinates the rendering, and if enabled, also generates previews. If this machine is suitable for being a worker this can be enabled as well.
- Worker — For additional render nodes that connect to the existing server.
Software updates and DCC submitters are installed directly from the dashboard after setup.
Docker
/app/state— Stores database, previews, and cache. Use any persistent path on your Docker host./shared— Your network folder for scene files and software updates. Must be accessible by all workers./renders— Only needed if you want preview/gallery features and workers render to folders outside the shared directory. The server needs access to rendered files to generate thumbnails and previews.
When workers run on Windows/Mac and the server runs in Docker, the same network folder has different paths. QFRAME_PATH_MAPPINGS tells the server how to translate paths for preview generation.
Format: windows_path::linux_path::mac_path
Example: Z:/Projects::/shared::/Volumes/NAS/Projects
Multiple mappings: Separate with | (pipe)
Server Setup
The server coordinates your render farm and hosts the dashboard. During setup, you'll select a shared network folder accessible by all machines. This folder stores scene files, render output, and software updates.
That's it—the server handles discovery automatically so workers can find it without manual configuration.
Worker Setup
Workers connect to the server and render assigned frames. In most cases, auto-discovery handles everything—just start qFrame on any machine and it finds the server automatically.
http://192.168.1.100:8080). Make sure port 8080 is open in your firewall.Dashboard
Access the dashboard by clicking the qFrame icon in your system tray, or navigate directly to the server's IP address in any browser on the same network.
The dashboard has three main sections:
- Jobs — View all render jobs with progress bars, thumbnails, and status.
- Machines — Monitor connected workers with hardware stats and controls.
- Statistics — Track render history and performance metrics.
Preview and Review
qFrame generates a thumbnail from the first completed frame so you can verify your render is working correctly. When an entire sequence finishes, qFrame can generate a preview video for quick playback (if enabled in settings).
Click any thumbnail to open the preview player:
| Key | Action |
|---|---|
Space |
Play / Pause |
← → |
Step frame by frame |
I / O |
Set In / Out points for loop regions |
L |
Toggle loop |
F |
Focus mode (hides controls) |
Scroll |
Zoom |
Middle-drag |
Pan |
Creating Jobs
Jobs are submitted from your DCC application using submitters. Install submitters from the dashboard under Settings. Currently available for Blender, 3ds Max, Fusion, with more coming.
Once installed, each submitter integrates into your application's interface. Set your frame range, output settings, and click Submit. Your job appears in the dashboard.
Submitters
Blender
npanel → qFrame
The Blender submitter has a lot of added features compared to the submitters for the other softwares. qFrame was initially designed as a fully blender native tool, before support for more software was added. Therefore you can use the Blender to control and monitor jobs without leaving the software. When using the blender addon, the dashboard is mostly optional.

3ds Max
Top toolbar → qFrame
Works with V-Ray, Arnold, Corona, and Scanline. Scene dependencies are automatically collected.
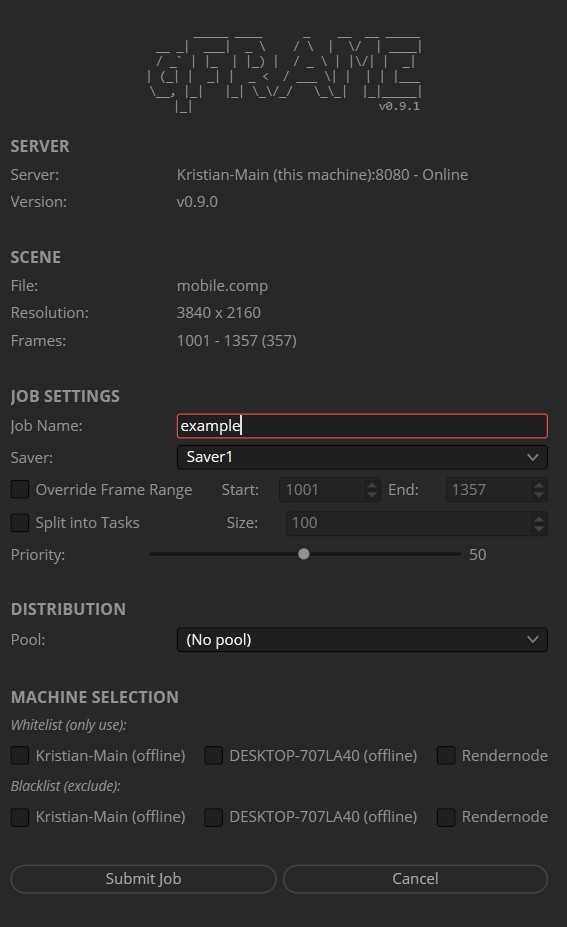
Fusion
Toolbar → Script → qFrame_submitter
Submit compositions with Saver nodes directly to your farm.
Maya Coming Soon
Houdini Coming Soon
Cinema 4D Coming Soon
Nuke Coming Soon
After Effects Coming Soon
DaVinci Resolve Coming Soon
Job Actions
Most job controls are intuitive—pause, resume, restart, or delete jobs as needed.
Machine Management
The Machines tab shows all connected machines with their current status:
- Ready — Worker is running and waiting for tasks
- Working — Currently rendering
- Inactive — Worker is not running on this machine
- Dead — No response (machine offline or crashed)
Machine controls include Start Worker, Stop Worker, Wake (Wake-on-LAN), Sleep, and Shutdown.
Auto-Update
When a new version is available, you'll see a notification in the dashboard (bell icon in the header). Click to view release notes and download.
Updating is simple: one click downloads the update to your shared folder, then all workers update automatically. If any machine misses the update, it can install manually from the updates folder.
Settings
The Settings panel (gear icon) provides access to:
- Display preferences — Refresh interval, sort order, theme
- Software updates — qFrame and submitter updates
- License management — Activation, seat status, subscription
- Remote Access — Enable access from outside your network
- Server Worker — Toggle whether the server machine also renders
License
qFrame includes a 45-day trial with full functionality and one Remote Access seat included. Just install and go.
After the trial, The header will take you to the store to purchase the amount of licenses you need.
Remote Access
Access your farm from anywhere using app.qframe.io:
- Go to Settings → Remote Access
- Add the email adress that should be whitelisted as a remote access account.
- Open app.qframe.io from any device and login to check your progress.
Remote Access requires a separate Remote Access license (one seat is included in the trial period).
Troubleshooting
Workers won't connect
Check that the server is running. Verify firewall settings allow port 8080. If auto-discovery fails, try entering the server URL manually in the worker's settings. You can find the server IP by right clicking the tray icon and entering settings on the server machine.
Jobs won't start
Make sure scene files are saved to the shared folder. Verify the required software (Blender, Maya, etc.) is installed and detected on your workers.
Frames fail
Check the render log for error messages. Common issues: missing textures (ensure they're on the shared folder or packed in the scene), out of memory, or GPU driver problems.